How to Crochet the Granny Stitch (Beginner Guide)
If you picture classic crochet in your head, there is a good chance you are picturing the granny stitch. It is the stitch behind the granny square, the…


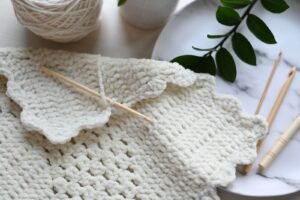
If you picture classic crochet in your head, there is a good chance you are picturing the granny stitch. It is the stitch behind the granny square, the granny stripe blanket, and more scrap-busting, color-changing projects than almost any other pattern in crochet. Part of the reason it has stuck around for generations is how simple the underlying idea is: small clusters of stitches, worked into gaps rather than individual stitches, repeated over and over. Once you understand that one idea, you can work the granny stitch in flat rows or build it outward in the round, and both use exactly the same building block.
Jump to section
What You’ll Need
– Worsted (#4) weight yarn, ideally in two or more colors if you want to practice color changes – A crochet hook sized for your yarn (a 5.0mm hook is a common match for worsted weight) – Scissors and a yarn needle for weaving in ends
Quick abbreviation key before we start: ch (chain), dc (double crochet), sl st (slip stitch), st (stitch), sp (space), and rnd (round). You will see all of these below.
The Granny Cluster: The Basic Building Block

Every version of the granny stitch, whether worked in rows or in the round, is built from the same small unit: a cluster of 3 dc worked together into a single space. The detail that makes this stitch look the way it does is that each cluster is worked into the ch-1 sp (or ch-2 sp at a corner) left by the row or round below, never into the top of an actual stitch. Skipping over the stitches themselves and dropping into the open sp below is what gives granny stitch fabric its signature airy, textured squares.
Working the Granny Stitch in Rows (Granny Stripe)
To practice the row version, chain a multiple of 3, plus 2 (for example, chain 23).
Row 1: Dc in the 6th ch from the hook. *Ch 1, skip the next 2 ch, 3 dc in the next ch; repeat from * across to the last 3 ch. Ch 1, skip 2 ch, dc in the last ch. Turn.
Row 2: Ch 3 (this counts as your first dc), turn. 3 dc into the first ch-1 sp. *Ch 1, 3 dc into the next ch-1 sp; repeat from * across to the turning chain, ending with ch 1, dc into the top of the turning ch-3. Turn.
Repeat Row 2 for every row after this. Notice that from Row 2 onward, you are no longer working into any chain stitches at all, only into the ch-1 spaces and the top of the previous turning chain, which is what keeps the clusters stacking neatly into vertical columns as the rows build up. This row-based version is often called a granny stripe, and it is the basis for granny stripe blankets, scarves, and cardigans.
Working the Granny Stitch in the Round (Granny Square)
The same 3-dc cluster is also the basis of the classic granny square, just arranged around a center ring instead of across a row.
To begin: Make a small ring, either by chaining 4 and joining it into a circle with a sl st, or by using a magic ring.
Rnd 1: Ch 3 (counts as your first dc). Work 2 dc into the ring, ch 2, then *3 dc into the ring, ch 2; repeat from * two more times, so you have 4 clusters total with a ch-2 sp between each one. Join with a sl st to the top of the beginning ch-3. You now have 4 corners.
Rnd 2: Sl st across to the next ch-2 corner sp. Ch 3 (counts as your first dc), then work (2 dc, ch 2, 3 dc) all into that same corner sp – this is a full corner cluster. Ch 1, then *(3 dc, ch 2, 3 dc) into the next corner sp, ch 1; repeat from * around the remaining 3 corners. Join with a sl st to the top of the beginning ch-3.
Every round after this follows the same idea: work a full corner cluster of (3 dc, ch 2, 3 dc) into each ch-2 corner sp from the round below, and a single plain 3-dc cluster into each ch-1 sp along the sides, adding one more cluster per side with every round out. This is exactly what makes a granny square grow evenly in all four directions while staying perfectly square.
Starting a Row or Round: The Ch-3
You will notice that both the row and the round versions begin with a ch 3 before the first cluster. That chain-3 stands in for, or “counts as,” your first dc of that row or round, which is why the first true cluster after it only needs 2 more dc rather than a full 3. Keeping track of that counted stitch matters most at the very end of a round or row, when you join or turn back into the top of that ch-3 rather than searching for a stitch that is not actually there.
Changing Colors
Granny stitch projects are famous for their color changes, and the technique is simple once you know the timing. Work the last dc of a cluster until 2 loops remain on your hook, then instead of finishing that stitch with your current color, yarn over with the new color and pull it through both loops. That single motion finishes the old stitch and starts you off in the new color at the same time, so the color change happens invisibly right at the top of the stitch. For granny squares worked in rounds, many makers simply fasten off at the end of a round and join the new color with a sl st into the next corner sp, then chain 3 and continue as usual.
Uses for the Granny Stitch
The granny square is the foundation of countless blankets, made by crocheting a large batch of squares and joining them together, and it is just as popular worked as a single, oversized square all on its own. The granny stripe version, worked flat in rows, turns up in blankets, scarves, ponchos, and cardigans, anywhere you want a fast-growing, textured fabric that shows off color changes beautifully. Both versions are also popular for bags and totes, since the dense cluster stitches hold their shape well.
Beginner Tips
Always look for the space, not the stitch. The single most common beginner mistake is accidentally working into the top of a dc instead of into the ch-1 or ch-2 sp underneath it. Before you start a new cluster, pause and find the actual gap to work into.
Keep your ch-3 loose enough to work back into. A tight starting chain-3 can be hard to find again when you join or turn back into it later, so aim for a relaxed, even tension on that first chain.
Mark your corners on a granny square. Once you have more than a couple of rounds, the 4 corner spaces can start to look similar to the side spaces. A stitch marker in each corner sp keeps you from confusing an increase corner with a plain side.
The Payoff
There is a reason the granny stitch has survived as a beginner favorite for generations: it turns a handful of simple dc clusters into fabric that looks far more complicated than it actually is, and it rewards you with new colors and new shapes as fast as you can chain and cluster your way around. Once the rhythm of “find the space, work the cluster, chain, repeat” feels natural, you will have the one skill behind an entire world of granny square blankets, stripes, bags, and garments, ready to build in whatever colors you love most.
Frequently asked questions
Why is my granny square starting to ruffle or cup instead of lying flat?
Ruffling usually means you added an extra cluster somewhere in a round, often at a corner, while cupping means a cluster or a corner got skipped. Count your clusters per side against the round number after every round or two so you catch the difference before it compounds.
Can I turn a granny square into a granny rectangle instead?
Yes, you work two opposite sides with a plain 3-dc cluster increase instead of a full corner cluster, so the rectangle grows in length while the other two corners keep expanding normally. It takes a little practice to keep the proportions even, so a small test swatch helps before committing to a full rectangle.
What is the best way to join finished granny squares into a blanket?
Whip stitching or slip stitching through the back loops of matching stitches is simple and low-bulk, while join-as-you-go methods worked during the final round of each square skip separate seaming entirely. Either way, matching up your corner spaces carefully keeps the seams from puckering.
Can I use half double or treble crochet instead of double crochet for the clusters?
You can, and it changes the scale and drape of the finished fabric, treble crochet clusters growing faster and looser, half double crochet ones staying denser and shorter. Just know that swapping the stitch height changes your gauge, so a pattern’s finished size will no longer match exactly.
What’s the easiest way to manage all the yarn ends from frequent color changes?
Weaving in a tail as you go, right after finishing the round it belongs to, keeps a stack of loose ends from building up by the time you finish a big blanket. Working over the tails for a stitch or two as you crochet the next round also cuts down on separate weaving-in time later.
— NoraEvery pattern hand-tested