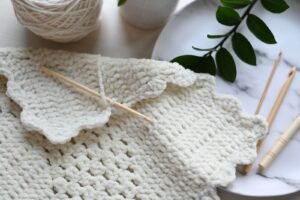
How to Crochet the Shell Stitch (Beginner-Friendly)
If you have ever admired a crochet blanket with soft, scalloped ripples running across it, there is a good chance you were looking at the shell stitch…


If you have ever admired a crochet blanket with soft, scalloped ripples running across it, there is a good chance you were looking at the shell stitch. It has a fancy, almost lace-like reputation, but here is the good news: it is really just one simple trick, repeated across your row. You work several double crochets into the very same stitch, and they naturally fan out into a little shell shape. If you can already make a chain (ch) and a double crochet (dc), you already have what you need to learn this one. Grab some smooth, light-colored yarn and a hook that matches the label, and let’s build your first row of shells together, slowly and in order.
Jump to section
What the Shell Stitch Actually Is
A “shell” is just a cluster of double crochets, usually five, worked into one single stitch (st) so they spread out at the top like a little fan. On their own, five stitches crammed into one spot would just bunch up the fabric, so on either side of each shell you skip a stitch or two in the row below. That skipped space is exactly what lets the shell open up and lie flat instead of puckering. Between shells, you anchor the row with a single crochet (sc), which holds everything in place and gives your eye a little resting point between fans. Skip, fan, skip, anchor, repeat: that four-beat rhythm is the entire stitch.
Abbreviations You Will See

– ch – chain – st – stitch – sc – single crochet – dc – double crochet: yarn over (yo, wrapping the yarn over your hook), insert your hook into the stitch, yo and pull up a loop, yo and pull through two loops, yo and pull through the last two loops – yo – yarn over, the wrap of yarn around your hook that happens inside every dc you make
What You Need to Practice
– A smooth, light or medium-colored worsted weight yarn (dark colors hide your stitches while you are learning) – A crochet hook sized to match your yarn label – Scissors and a yarn needle for weaving in ends later
Building Your Foundation Chain
The shell stitch repeat uses a multiple of 6 stitches, plus 1 extra to finish the row cleanly. For a practice swatch, chain 19. That gives you three full shell repeats plus the extra chain that lets the row start and end neatly on a single crochet.
Row 1: Your First Shells
1. Sc in the 2nd chain from your hook. This is your very first anchor stitch. 2. Skip the next 2 chains. 3. Work 5 dc into the next chain, all into that same stitch. Those five stitches fanning out of one spot are your first shell. 4. Skip 2 chains again. 5. Sc into the next chain. This anchors the shell you just made and sets up the gap for the next one. 6. Repeat steps 2 through 5 (skip 2, 5 dc in the next stitch, skip 2, sc in the next stitch) across the rest of the row, finishing with a single sc in your last chain. Turn your work.
Take a look at what you have made: a row that reads sc, shell, sc, shell, sc, all the way across, like a string of little fans anchored between posts. That is a complete row of shell stitch.
Row 2: Stacking Shells Over the Anchor Stitches
This is the step that turns a single row of shells into real shell stitch fabric, because it is what makes the fans in the next row sit directly over the sc anchors from the row below, rather than stacking right on top of the shells themselves.
1. Chain 1 and turn. This turning chain does not count as a stitch here. 2. Sc into the first stitch. This lines up with the last anchor stitch you made in the row below. 3. Skip the next 2 stitches (these will be two of the five dc from the shell below). 4. Work 5 dc into the next stitch, which is the sc anchor from the previous row. This is the moment the new shell “stacks” directly over the old anchor point, which is what gives shell stitch its pretty, offset, brick-like texture instead of plain vertical columns. 5. Skip 2 more stitches, then sc into the center (third) dc of the shell below to anchor between your new fans. 6. Repeat steps 3 through 5 across the row, ending with an sc worked into your last stitch or turning chain.
Your edge stitches at the very start and end of each row will sometimes fall a little short of a full shell, since the pattern is offsetting by half a repeat each time. That is completely normal in shell stitch: many crocheters simply work a half shell (2 to 3 dc instead of 5) at the very edges to keep the sides of the fabric straight. It does not throw off the pattern in the middle of your row, and once you are a few rows in, your eye will find the rhythm without needing to count constantly.
Tips for Even, Pretty Shells
Keep your five dc snug at the base. They all share one stitch, so if your first dc is loose, the rest can crowd or lean instead of fanning out symmetrically.
Count your skips out loud at first. “Skip two, five in this one, skip two, sc” is easy to say under your breath as you work, and it catches mistakes before they compound across the row.
Use a stitch marker on the center dc. Since Row 2 asks you to find the middle stitch of each shell, clipping a marker into the third dc as you finish Row 1 makes Row 2 much faster to work.
Block your swatch when you are done. A light steam or a gentle wet block helps the fans relax open fully, which is often when shell stitch looks its prettiest.
Where the Shell Stitch Shines
Shell stitch is a workhorse in crochet because it is decorative without being fussy. You will see it used for:
– Blankets and afghans, where full rows of shells create a soft, scalloped texture that still works up quickly since each shell covers several stitches at once – Edgings and borders, added around the outside of a plain blanket, pillow, or garment to dress up an otherwise simple project – Tops and cardigans, where a lighter yarn turns the same fan shape into an airy, feminine stitch pattern – Scarves and cowls, where the natural drape of the shells adds movement without adding bulk
You Are Ready to Shell Stitch
The shell stitch has a reputation for looking advanced, but you now know its real secret: it is just five double crochets sharing one stitch, framed by a skip on either side and tied down with a single crochet. Once that skip-fan-skip-anchor rhythm settles into your hands, you will be able to glance at almost any shell stitch pattern and recognize exactly what it is asking you to do. Practice one more swatch tonight, and you will have a new stitch in your toolkit that makes every plain blanket or edging look a little more special.
Frequently asked questions
Why does the foundation chain need to be a multiple of 6 plus 1?
Each shell-and-anchor repeat uses exactly 6 stitches: 2 skipped, 1 shell, 2 skipped, 1 anchor. The extra stitch at the end lets the row start and finish on a tidy single crochet instead of a half-finished shell.
Can I make shells with fewer or more than 5 double crochets?
Yes, that’s a common variation. Three or four dc gives a flatter, tighter shell, while 7 dc gives a fuller, more dramatic fan. Just adjust how many stitches you skip on either side to match how wide the resulting shell spreads.
My shells don’t line up neatly at the edges of the row — is that a mistake?
Not necessarily. Shell stitch offsets by half a repeat every row by design, so the first and last stitches often can’t form a full shell. Working a half shell of 2 or 3 dc at each edge is a normal, accepted fix rather than a sign of an error.
Does shell stitch use more or less yarn than a plain stitch like double crochet?
Less, usually. The skipped stitches between shells leave open, lacy gaps instead of dense fabric, so a shell stitch project typically stretches further on the same amount of yarn than a solid dc piece the same size.
Can shell stitch be worked in the round instead of back and forth?
Yes, and it’s a very common way to use it, especially for doilies and granny-style blankets. The same skip-fan-skip-anchor rhythm applies; you just work continuously around instead of turning at the end of each row.
— NoraEvery pattern hand-tested